Replacing the Air Filter
The air filter is intended to prevent dust and other airborne particles from entering the chassis and adversely affecting its components. To maintain proper operation of the device, you must periodically replace the air filter. The frequency of replacing the air filter depends on the cleanness at the installation site. In installation rooms with extra-building openings (exposed to dust and/or air particles), you may need to replace the air filter once every 3 months. In cleaner rooms (e.g., no extra-building openings), you may need to replace the air filter once every 6 months. In air-purified (conditioned) rooms, air filter replacement can be done annually. It's the user's responsibility to determine the cleanness level and the air filter replacement frequency.
|
●
|
The device's components may be damaged due to a dirty or blocked air filter. |
|
●
|
Replace the air filter only with an air filter purchased from AudioCodes. |
|
●
|
Before removing the air filter, make sure that you have the replacement air filter on hand so that you can replace it immediately. |
The air filter is hot-swappable.
|
➢
|
To replace the air filter: |
|
1.
|
On the front panel, remove the Fan Tray cover, by loosening the four Philips-head, spring-loaded captive screws located in each corner of the cover and then gently pulling the cover away from the chassis: |
Removing Fan Tray Cover on Front Panel

|
2.
|
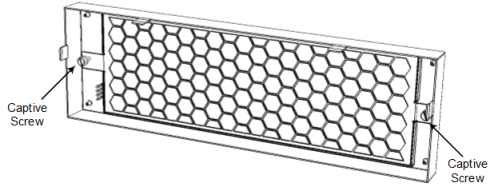
Remove the air filter cover, located on the inside of the Fan Tray cover, by removing the two flat-head, spring-loaded captive screws located on either side of the air filter cover, using a flathead screwdriver: |
Removing Air Filter Cover from Fan Tray Cover
|
3.
|
Pull out the exposed air filter from the enclosure of the air filter cover and dispose of it: |
Removing Air Filter from Air Filter Cover

|
4.
|
Insert the new filter into the enclosure of the air filter cover. |
|
5.
|
Attach the air filter cover back on the Fan Tray cover by using the two spring-loaded captive screws (see the figure in Step 2). |
|
6.
|
Attach the Fan Tray cover to the chassis (see the figure in Step 1). |